

The Ultimative Filament Drybox
Introduction
So… I saw those filament dryboxes. Of course I’d wanted to design one by myself so badly…
And here it is! Let me introduce an overengineered but cool looking drybox spool stand!
- Does it print fast? No!
- Does is has bearings? Damn, yes!
- Will I need metal saw? Of course yes!
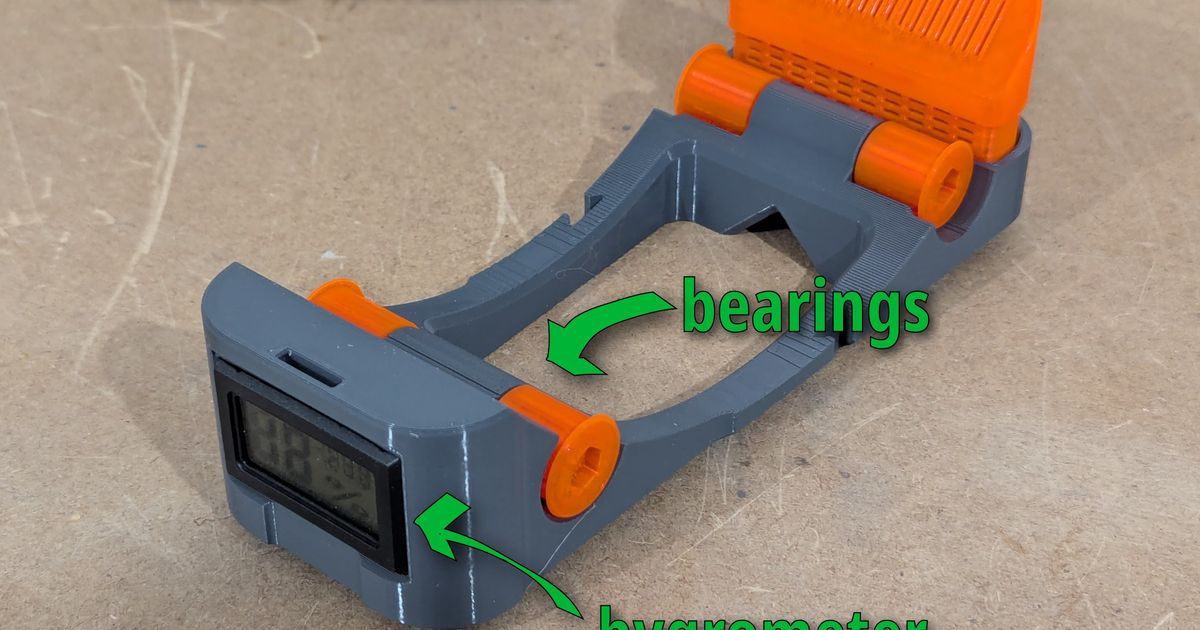
- Can I insert a hygrometer? I’ve got you covered!
- And silica gel? What’s about silica gel? Put it into the included container!
Motivation
I designed this quad-roller-spool-baseplate with maximum spool width in mind for a 4L cereal box. The four rollers have small but sufficient shoulders, so any spool smaller 68mm in width can fit.
All parts are designed to fit into 4 liter “Skroam” cereal boxes with three finger grips, you can find these at the big A.
For my Prusa Core One an outlet on the top is perfect. This way I can put the box besides the printer. If I’d like to store a spool for a longer period, I swap the printed cover with the original one, and the box is 100% air tight.
BOM
To build one box you’ll need:
Printed parts
-
1x BasePlate (Filabox-BasePlate.stl)
-
1x Cover (Filabox-Cover.stl)
-
1x Silica box (Filabox-Silicabox.stl)
-
1x Silica box cover (Filabox-SilicaboxCover.stl)
-
4x Roller (Filabox-Roller.stl) Additional parts to buy
-
1x 4l cereal container, obvious
-
1x 4mm PTFE tube of your needed length
-
4x bearing 685ZZ (5x11x5mm)
-
2x M5 threaded rod L=62mm max. (61.0mm to 61.8mm will fit best)
-
1x digital rectangular hygrometer
-
1x bondtec push-fit pneumatic coupler (PTFE ECAS04)
Optional parts -
2x Roller Tool (Filabox-RollerTool.stl), it’s a tiny allen key to mount the rollers easily
-
1x Cap (Filabox-Cap.stl) to close the PTFE tube
-
1x PC4-M6 pneumatic coupler for the cap How to print
I printed my parts with PLA: -
Base: 2 perimeters, lightening infill, 15%, support for the hygrometer-bridge, 0.25mm layer height
-
Rollers: 3 perimeters, infill 30%, change scarf joint placement, 0.2mm layer height
-
Other parts: 2 perimeters, infill as needed, 0.2mm layer height
-
However, if you’d like to change anything for your needs, go for it.
For your convinience: I’ve added a 3mf file with all parts for one box and appropriate settings!
Assembly
- Print all parts
- Cut 2 pieces of a M5 threaded rod to a length 61-62mm (max.)
- Insert all 4 bearings as shown in the pictures
- Screw the threaded rod pieces in one roller each (thread will cut into plastic)
- Get the rollers with mounted rods into the bearings (gently)
- Screw the second roller for each axis very carefully until no gap is left
- Insert hygrometer
- Finally, fill your silica container and put all together Rollers should turn easily! Don’t screw it tight, the bearings are tiny and should not give you any resistance!
Appendix
You may ask… What the heck are the V-slots for? Why is there a notch on the top? Well… You’ll might surprise me with your addons for smaller spools or clip-on filament labels :)
What advantage does this have over the gunplamark’s Ultimate Cereal Drybox with the precise roller remix option?
I’ve printed many of the Ultimates because it has a top cover that lets the boxes stack or hang on whatever wall mount you have. So I have some standing in shelves and others hanging on my Multi board.
I went with gunplamark’s Ultimate Cereal Drybox too. For mine, I did his remix with cmyk’s precision single bearing rollers (https://www.printables.com/model/1339511-precision-single-bearing-spool-rollers) instead, which only uses two bearings instead of 4 per box. I also made myself a pegboard adapter using Sy’s pegboard pegs and a blank hanger.
Yes the CMYK precision rollers are what I switched to as well. The original rollers, even all the remixed variants to be extra wide, do not work and are a pain to use even if they did work.
That’s awesome, sounds like we made identical configurations! For the original roller, I ended up having to widen the part with the spoke 1mm so that my bearings would roll, but it seemed like such a waste to use 4 per box. It wasn’t until a few weeks later I came across cmyk’s solution. I really like it except it is a bit difficult to get a nut to interface with a screw. I think I have the knack down now. Really, I could almost see not using a screw and nut with it since it fits together so tightly, but if I didn’t do it, it would probably come apart at the worst time during a print.
I’ve printed 10 so far and haven’t used the screw/nut. It fits so tightly that I’ve snapped the plastic trying to redo one of them. So the screw seems unnecessary.
Nice! I really like these boxes based upon that cereal box, but you have to watch out, there are copycats of the Wildone. This is the one you should buy (and appears to be the one you used): https://www.amazon.com/dp/B07NP98YKY.
At first, I accidentally purchased ones by “MCIRCO.” Despite having almost the exact same product pictures, they are not the same.
